Blender Tips
These are some quick and dirty Blender instructions.
Manipulating Objects
You can translate, rotate and scale selected objects by typing G, R or S repsectively. The G stands for "grab". Right click or type escape to put the object back. Left click or type enter to accept the change.
There are a few modifiers worth mentioning. Once you have typed G, R, or S:
- Type x, y or z to constrain the modifications to a particular global axis.
- Type xx, yy or zz to constrain mopdification to the object's local axis.
- Type a number to indicate the amount of modification.
Examples
After selecting an object:
s z 2
to scale the object by a factor of 2 along the z axis.
r y -45
to rotate the object -45 degrees around the y axis.
g x x 10
moves an object 10 units along its own x axis.
s .5
scales the object by half in all dimensions.
Duplicating Objects
After selecting the object you wish to duplicate:
- Type Shift D to duplicate the object and its mesh.
- Type Alt D to duplicate the object, but use the same mesh.
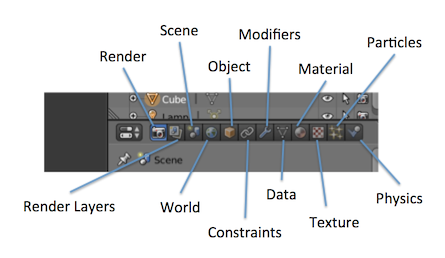
Properties Editor
You will find the properties editor on the right of the default screen layout
beneath the scene outline. Most of these buttons are really useful, so I've provided
the image below with names of each.

Multi-Colored Material
- Switch to mesh mode (TAB)
- Select some nodes (b for border select or right click for individual nodes)
- Create a new material for the object
- Hit the "Assign" button to assign the material to the selection.
Painting an Object
UV Unwrap the object
- At the top of blender there is a drop down menu to the left of the word "Default"
- Select "UV Editing" from the menu.
- Switch to mesh mode (TAB)
- From the mesh menu at the bottom of the right window
select "UV Unwrap..." -> "Smart UV Project"
- Hit OK on the dialog that pops up.
Create the image texture
- On the left window, click the "New" button.
- Change the name of the image in the dialog that pops up.
- Use the scroll wheel to so you can see the whole image and projection.
- Type A to select all.
- Type S to scale the projection to fit in the image (the black square).
You can also use G to move and R to rotate the projection.
- In the Image menu, select "Save As..." and give the image a name.
- Don't forget to save the image as you work on it.
- You can also export the UV pattern as an image by going to the UV's Menu
and selecting "Export UV layout" and then work on it in a paint program.
Paint on the object
- On the right window where the selection box says "Edit Mode" and choose "Texture Paint".
- You can now use the paint tools to select colors and draw on the object.
Set the texture of the object
- Switch from "UV Editing" view to "Default" view at the top.
- In the right pane, select the material button and then click the "New" button.
- In the right pane, select the texture button (see image above) and then click
the "New" button.
- Set "Type" to "Image or Movie"
- Click the "Open" button and select the image.
- Scroll down to the "Mapping" section.
- Set "Coordinates" to "UV"
Combine two objects
- Add two meshes in the scene.
- Select one.
- Click the Modifiers button in the panel on the right (it looks like a wrench).
- Click "Add Modifier"
- Select "Boolean"
- Choose the operator e.g. "Intersect"
- Select the other object in the drop down.
- Click "Apply"
- You can delete the second object by selecting it and typing X.
Setting up the OGRE exporter
You only have to do this once.
- From the File menu choose "User Preferences"
- Type "OGRE" in the search box.
- If the Ogre exporter shows up, check the box on the right to enable it.
- If there are no results, click the "Find in File..."
button at the bottom. Find the file called "ogremeshexporter.py", on our workstations
it has been installed in /usr/lib/blender/scripts. For your own computer it can be
downloaded from
MindCalamity's bitbucket site.
Export to OGRE
- Make sure you are in Object mode (TAB).
- Type A once or twice to select everything. This is important if you are going to
use the entire scene. If you are only going to use one mesh, you only need to select it.
- In the File menu, choose "Export" and the choose "Ogre3D".
Editing by extrusion
- Start with a simple object like a cube, or even a circle.
- Type TAB to switch to mesh mode.
- Deselect all of the vertices by typing Shift-A.
- Select vertices around an individual face. There are a number of ways to do this:
- Right click on one vertex and then hold down the shilft key while right clicking others.
- Border (B) or Circle (C) select a group of vertices.
- Select edges with ALT-Right Mouse Button and Shift-Alt-Right Mouse button to ad others).
- Type E to extrude the side. Note once you hit E the side is extruded if you don't move it anywhere it is still additional faces.
- Use G, S, R as usual to manipulate the new face.
