 |
CS 371 Cozmo Project Documentation
|
Introduction
Our group programmed a Cozmo robot to be able to localize itself using the Monte Carlo Localization algorithm.
Goals
- Learn how to program with Cozmo.
- Find a possible solution to the robot kidnap problem and implement it in Cozmo.
Robot Localization Steps
- 1. Takes images:
- Rotate camera angle and take images.
- Save images to particular folder in the computer.
- 2. Stitch images together:
- Stitch the images for a panorama view. This will be the robots map.
- Downsample this image to a lower resolution.
- 3. Have Cozmo "get lost":
- Have Cozmo turn at a random angle.
- 4. Have Cozmo find out where it is:
- Using Monte Carlo Localization Cozmo will know where it is.
Software Used
PyCharm -- Used for python coding.
Jupyter Notebook -- Used for python coding.
Set Up
For Windows:
- 1. Go to the developer website: "http://cozmosdk.anki.com/docs/"
- Go to "Installation-Windows"
- 2. In the Python Installation section, download latest version of Python from Python.org
- During installation, tick the Add Python to Path checkbox on setup screen on the first screen of the installer window
- "Install"
- 3. In the "SDK Installation" section, download the Cozmo SDK files:
- In the Python installation on the windows/macOS install page
- Open up the command prompt/terminal
- (optional) pin the command prompt to your taskbar for quick/easy access to SDK
- Enter the command: "pip3 install --user cozmo[camera]"
- 4. Download OpenCV:
- To install OpenCV use the following command on the command prompt/terminal: "pip3 install openCV-python"
For Android:
- 1. On the Cozmo SDK website, click "Android Debug Bridge" page
- 2. Click "link" to download "platform-tools-latest-windows.zip"
- 3. Click "open folder"
- 4. Open a new files explorer window
- 5. Go to your user folder
- 6. Create new folder, name the folder "Android"
- 7. Go inside the "Android" folder
- 8. Move over/drag the downloaded "platform-tools-latest-windows.zip" into the "Android" folder.
- 9. Extract all files in that folder
- 10. Go into the folder "platform-tools-latest-windows" and go into the "platform-tools" folder
- 11. Right click start menu and navigate: "system" > "Advanced system settings" > "Advanced" > "environment variables" > "User variables for user" > "Path" > "edit"
- 12. In the "edit environment variable" window click "new" > "add path to adb"
- The path name should be along the lines of: "C:\Users\name\Android\platform-tools-latest-windows\platform-tools"
- 13. Click "ok" on everything to close out the windows
- 14. To double check your installation
- Open command prompt
- Enter "adb"
- If everything was installed properly, then the console will display information about the "adb"
Final Installation step for Mobile Setup:
- 1. Enable USB debugging on android device
- Instructions for specific devices are online. Lookup how to for your own device.
- 2. connect phone to computer
- 3. command prompt > "adb devices"
- 4. with cozmo app running, connect phone to robot
- 5. In app on phone, go to main menu > "settings" > "Cozmo SDK" > "Enable SDK"
Run Some Example Programs
- 1. on computer developer site > go to "Downloads" page > "Windows SDK Examples"
- 2. in command line > navigate to the folder you have the examples in (look for "Cosmo SDK examples" folder)
- 3. Extract the files (remember where you extracted to)
- 4. in command line, navigate to where you have "Cozmo SDK examples" and go to their tutorials
Run a code
- 1. go to the program you want to run: ""cd 01_basics""
- 2. in command prompt: "py 01_hello_world.py" (could also use tab completion)"
It is a good idea to run some more codes to test and ensure you are setup correctly. For the convenience of this document we only test the "hello world" code because it is iconic.
Code:
Click the link to access the code:
mcl code
Testing
To ensure the image slicing method worked, we used the IDE Jupyter Notebook with the Python language. We uploaded the panorama we obtained from Cozmo and took advantage of how user friendly and quick Jupyter Notebook is when displaying outputs.
To test the robot, we first picked out an area that would synchronize well with the panorama. A good location would include a place with good lighting, no moving objects, and a lot of variation within the environment. Cozmo would then execute his panorama making procedure and create the map. The MCL would run with the created map and interval inputs of images taken at varying degrees. MCL uses particles that represent a distribution of localization probabilities. To test where the cozmo is localized, we output the median particle after 10 iterations and use that particle location to determine where it is. If that location is on or near the actual final angle of the cozmo, we consider that a successful test. The pixels are converted to angles by taking the width in pixels of the panorama divided by 360, which is equivalent to one degree. We also tested by outputting the final image the cozmo took at its final image and seeing where it lined up in the panorama. This method was faster and used for the majority of the project because it is simple to debug.
MCL Algorithm
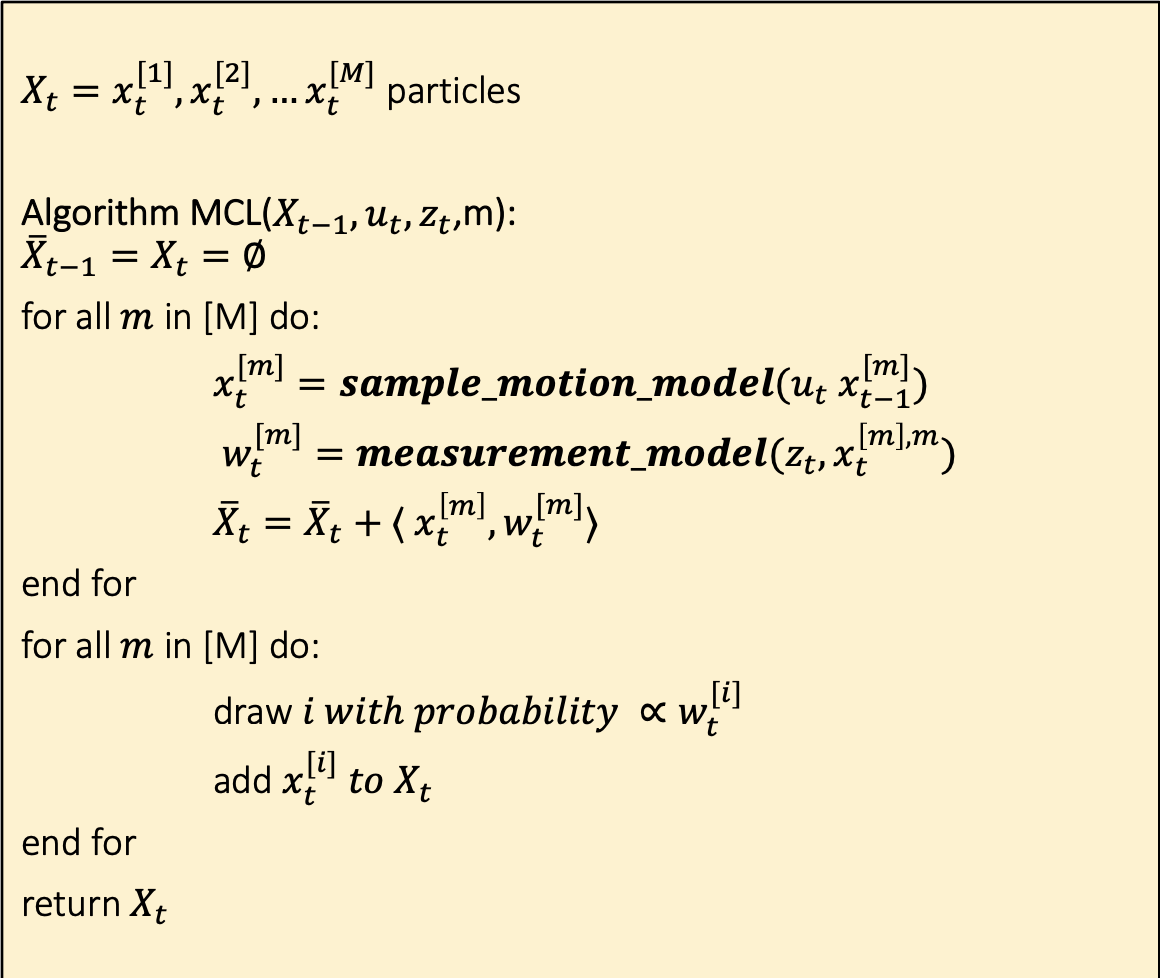
First we will have cozmo scan its environment and take picture to create a panoramic view of its environment and that image will become the map that cozmo will use
Then we will have cozmo move randomly, as in it will turn a random number of degrees.
We will take the panorama picture and lay it out in a one dimensional line such that we start at 0 degrees on the left and go to 360 degrees on the right. In the code, we use pixels as a measurement too.
We will then randomly assign 300 population points to a certain pixel and the pose of that population point will be an image cut from the panorama that has a center at that pixel.
- Each population point is a small image. The goal is for each point to be represented by range of points around it. For example, we have a population point at 1000 pixels. The image will be an image cut from the panorama from pixel 950 to 1050.
For each of the population points:
- Make a random movement - for example, say cozmo is faced towards 30 degrees, if we want to do a 5 degree movement, our random movement is 5 degrees, then cozmo will move 5 degrees to the right so that the the image now has the center of 35 degrees, it no longer has the center of 30 degrees. (conversions are used for degrees to pixels)
- Method Sample_motion_model reassigns the images. Updating the image based on how many degrees we are moving. Since we choose to move Cozmo using pixels, instead of degrees, we obtain the movement we want by dividing width of the panorama by 360.
- Method Measurement_motion_model weights the images. Grab the sliced image from the panorama and compares it with an image cozmo takes of its current location. We use the Mean Squared Error to compare the images. The images with the smallest difference are weighted higher. Therefore, we return the difference between our upper bound, in this case we use 7000, and the MSE of the two images, so we can give similar images a higher weight.
- Add the newPose with that weight to an array list
Redistribute population points based on those weights
Keep doing this for an amount of iterations. We use 5.
After the iterations, we take the point with the most population points and find where it is located on the panorama.
We then take that value and have cozmo turn from that degree back to degree 0
Conclusion
In the end we had all the pieces, however, we could not streamline them together as well as we wanted. At different points in time, certain components had worked exactly right and others a little less accurate. Part of this issue may be because we divided the implementation up between different pairs of people. And so when we combined everything together we had run into unexpected incompatible errors. In our efforts to fix them we had lost accurate function in some areas of the code, such that we changed things that ended up making other areas in the program not work as well.
As a group we each had our roles and each of us filled that role to the best of our ability. Through our pair coding we were able to make each part of the program work. We were able to localize the robot. However, there was a lack of consistency with the starting location of the panorama. On some runs, the panorama would consider degree 0 in the middle and sometimes it would consider degree 0 at the leftmost pixel. Other than this error, cozmo is able to localize with decent accuracy assuming a well generated panorama.
Future improvements:
There are multiple areas in this project that we feel could be improved upon in future iterations. First off, we believe that the one of the greatest areas of improvement involves how we represent our data. With the way the program is configured currently, we must read a degree value and compare that value to the original map that we give the Cozmo. Implementing a real time GUI would allow imaging how MCL is currently working throughout time. Another area that could be improved upon is the way that we manipulate our images. We relied heavily on OpenCV and we are unsure of how exactly their module manipulates the images. Using a machine with only two cores made it difficult to manipulate many images at the same time, and sometimes introduces failure. We also believe that the way error is introduced into our population could be improved upon.
Sample Motion Model method did not work. It returned a value that is never updated correctly. It should take into account the current pose.
Sources: